> ## Documentation Index
> Fetch the complete documentation index at: https://cubed3-pavel-claude-gallant-heisenberg-uomyfz.mintlify.site/llms.txt
> Use this file to discover all available pages before exploring further.
# Continuous deployment
> This guide covers features and tools you can use to deploy your Cube project to Cube Cloud.
Each Cube deployment is configured to use one of the following deploy modes:
* **Deploy with Git** — Cube Cloud builds and deploys your project from a Git
repository. Use this mode when you want commits to the production branch
(or merges performed from the Cube Cloud UI) to automatically trigger a
production build.
* **Deploy with CLI** — you push your project to Cube Cloud from your local
machine or CI/CD pipeline by running the `cubejs-cli deploy` command. The
production deployment is **not** updated by GitHub pushes or UI merges; it
changes when somebody explicitly runs `cubejs-cli deploy`.
You can change the deploy mode at any time on the **Build & Deploy** tab of
the **Settings** screen.
Independently of the deploy mode, you can [connect a GitHub
repository](#deploy-with-github) to the deployment. Non-production branches
already added to Cube sync when pushed to GitHub. Production deployment follows
the deploy mode: it auto-deploys in Git mode and stays manual in CLI mode.
## Deploy with Git
Continuous deployment works by connecting a Git repository to a Cube Cloud
deployment and keeping the two in sync.
First, go to the **Build & Deploy** tab on the **Settings** screen and
select **Deploy with Git** under **Deploy with**. From the same screen you
can pick the production branch, connect a Git repository, and copy the
commands that set up Cube Cloud as a Git remote:
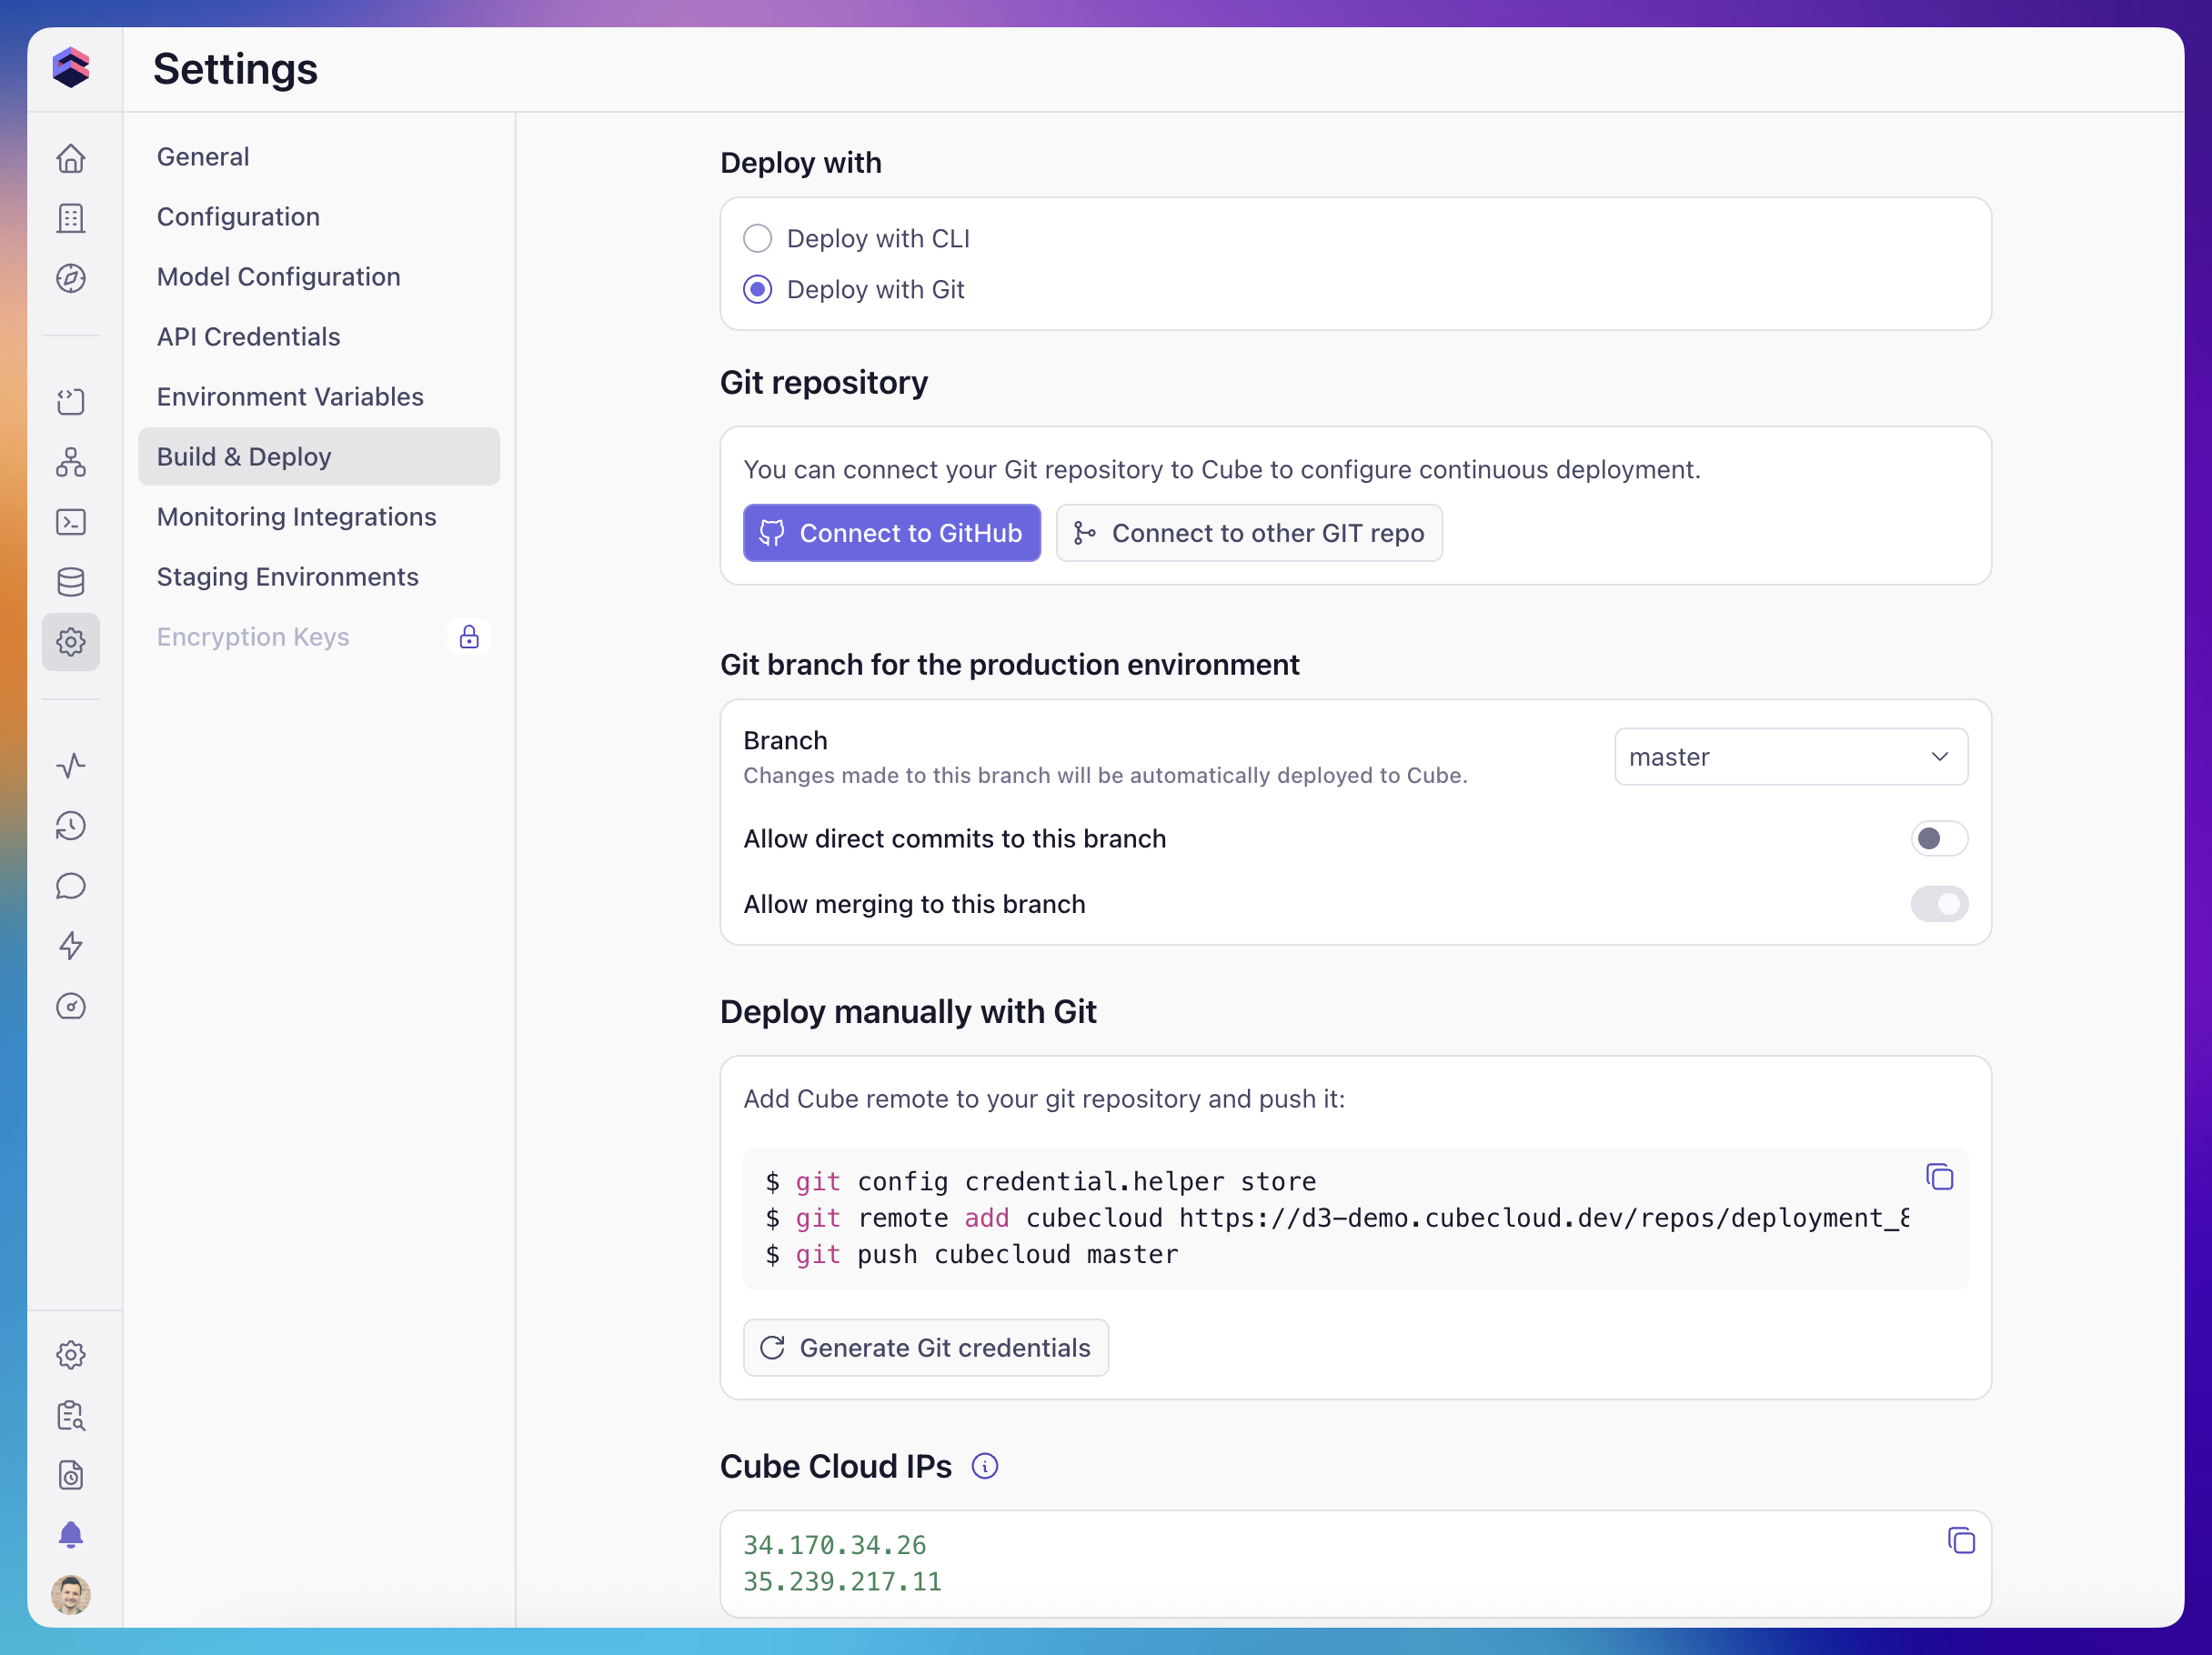 Click **Generate Git credentials** to obtain Git credentials. The instructions
to set up Cube Cloud as a Git remote are also available on the same screen:
```bash theme={"dark"}
git config credential.helper store
git remote add cubecloud
git push cubecloud master
```
If your data model already lives in GitHub, **connect that repository directly**
[below](#deploy-with-github). Push to GitHub; Cube sets up a webhook to receive
updates, so you do not need a second push to the `cubecloud` remote. For GitLab
or Bitbucket, [connect via SSH][ref-import-ssh] and **add the webhook to your
provider manually** as part of setup.
Use the Cube Git remote when you want to push directly to Cube without connecting
an external repository. Once an external repository is connected, direct pushes
to the Cube Git remote's production branch are rejected; push to the connected
repository instead.
## Deploy with GitHub
You can connect a GitHub repository to your deployment by clicking the
**Connect to GitHub** button on the **Build & Deploy** tab of the
**Settings** screen and selecting your repository. This works with both the
**Deploy with Git** and **Deploy with CLI** deploy modes.
If your organization uses SAML SSO for GitHub authentication, make sure to start an active SAML
session prior to connecting to your GitHub account from Cube.
What happens after connecting depends on the deploy mode:
* In **Deploy with Git** mode, pushes to the configured production branch
trigger a build when the Cube project changes.
* In **Deploy with CLI** mode, production deployment remains manual. See
[Connecting GitHub on a CLI deployment](#connecting-github-on-a-cli-deployment).
### GitHub App permissions
Install the **Cube Cloud GitHub App** on the account that owns the repository:
your personal account for a personal repository, or the organization for an
organization repository. Authorizing your GitHub login alone does not give the
app access to an organization's repositories. If the account is missing in
**Connect to GitHub**, choose **Add new organization** in the account selector
to open GitHub's app installation dialog.
Grant the installation access to the repository you want to connect, either
through **Only select repositories** or **All repositories**. GitHub displays the
full requested permission set during installation. The integration uses access
to repository contents to read and push commits, pull requests to propose model
changes, repository administration to create repositories, and webhooks to
receive push, pull-request, and branch-delete events.
Complete installation and any required organization-owner approval **before**
connecting or creating a repository. Your own GitHub access and the app's access
are separate: for a missing organization repository, check both with an owner.
If your organization restricts repository creation by apps, have an owner review
that policy or create the repository in GitHub and grant the app access to it.
### Creating a new repository
In **Connect to GitHub**, choose **Create new repository** to create a repository
under the selected GitHub account. This flow pushes the deployment's existing Git
content to GitHub; creating a repository does not itself generate a data model.
For an organization repository, Cube creates it using the app installation and
does not add you as a collaborator. The organization owns the repository. If you
cannot find or access it, ask an organization owner to grant you or your team
access.
### Project directory
When connecting an **existing** repository, the selected branch must contain
committed files in `model/` or legacy `schema/` under the Cube project directory.
For example, for `analytics/model/cubes/orders.yml`, set the project directory to
`analytics`, not `analytics/model`. Leave it empty for a project at the repository
root.
If you see **"Data Model folder not found at this location."** or **"Data Model
folder not found at root location."**, check the selected branch and project
directory. An empty repository cannot pass this validation. Commit and push your
model first, or create a project from scratch in Cube and connect a new repository
after generating the model.
## Keeping your repository in sync
GitHub push webhooks synchronize branches already added to Cube. Git
synchronization and environment activation are separate: see
[deployment environments][ref-environments] for when staging and development
environments are available and how suspension works.
When connecting an existing repository, Cube clones it before completing the
connection. A successful connection does not mean the initial production build
has finished.
Users with permission to edit the model can select an existing GitHub branch in
the branch switcher to add it to Cube; no new push is required. Select the
intended branch before comparing the IDE or **Cubes & Views** in Explore with
GitHub. If you are already in development mode, use
[pull from remote][ref-dev-mode-pull] to update your personal working copy with
changes pushed to GitHub.
If a pushed change does not appear:
* Check the repository, branch, and project directory in **Settings → Build &
Deploy** and confirm the deploy mode.
* In GitHub's repository **Settings → Webhooks**, check that the Cube webhook is
active and inspect the push delivery and response. Fix any access or delivery
error before redelivering a failed event.
* Check the build status, then open the intended environment. If the change is
still missing, [contact support][ref-support] with the deployment, branch,
commit SHA, and webhook delivery result.
For generic SSH integrations, rapid pushes can receive `429` responses. See
[webhook response codes][ref-import-ssh-webhooks].
## Deploy with CLI
`cubejs-cli` is deprecated. Use the new [Cube CLI][ref-cli] instead. In CI,
authenticate with an API key rather than the deploy token — set `CUBE_API_URL`
and `CUBE_API_KEY` (or run `cube login --api-key --url `), then run
`cube deploy --directory .` (find the id with
`cube deployments list`).
When a deployment is configured to deploy with CLI, production builds are
**only** triggered when you (or your CI/CD pipeline) push the project to
Cube Cloud by running:
```bash theme={"dark"}
npx cubejs-cli deploy --token
```
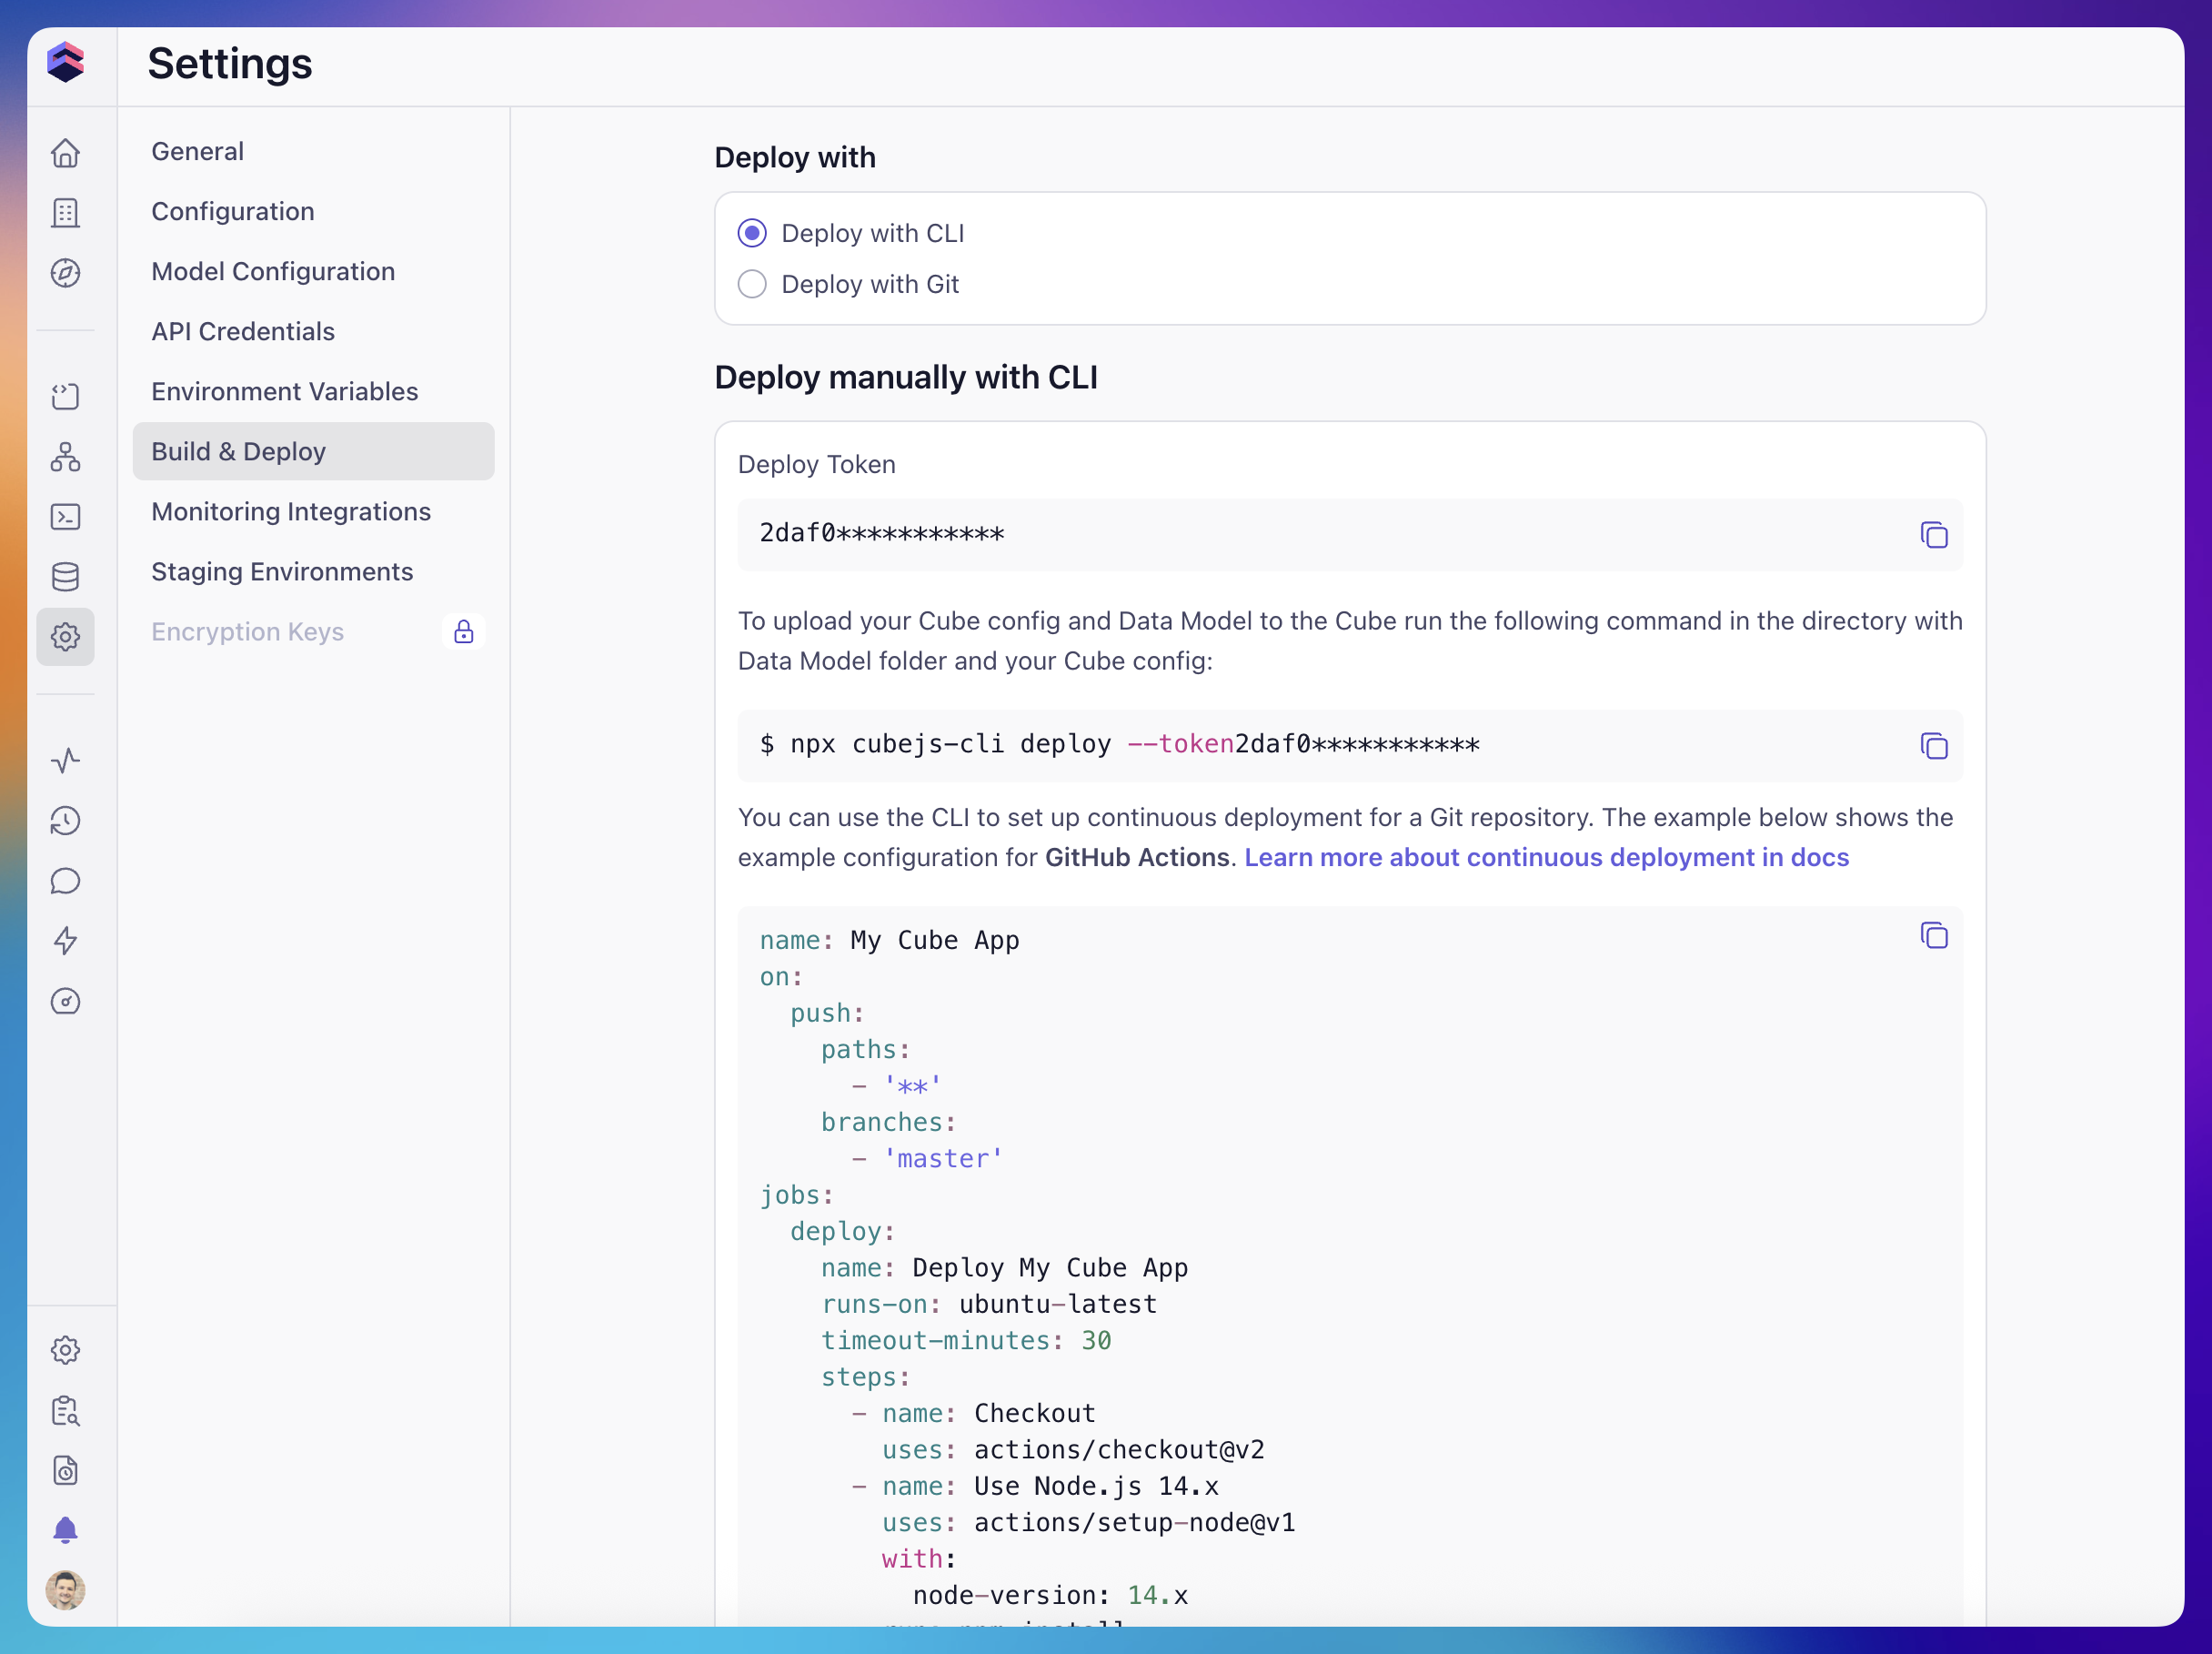
You can find your Deploy Token, along with copy-paste instructions and an
example CI/CD pipeline config (such as a GitHub Actions workflow), on the
**Build & Deploy** tab of the **Settings** screen. The same screen lets you
regenerate the token if it needs to be rotated.
Click **Generate Git credentials** to obtain Git credentials. The instructions
to set up Cube Cloud as a Git remote are also available on the same screen:
```bash theme={"dark"}
git config credential.helper store
git remote add cubecloud
git push cubecloud master
```
If your data model already lives in GitHub, **connect that repository directly**
[below](#deploy-with-github). Push to GitHub; Cube sets up a webhook to receive
updates, so you do not need a second push to the `cubecloud` remote. For GitLab
or Bitbucket, [connect via SSH][ref-import-ssh] and **add the webhook to your
provider manually** as part of setup.
Use the Cube Git remote when you want to push directly to Cube without connecting
an external repository. Once an external repository is connected, direct pushes
to the Cube Git remote's production branch are rejected; push to the connected
repository instead.
## Deploy with GitHub
You can connect a GitHub repository to your deployment by clicking the
**Connect to GitHub** button on the **Build & Deploy** tab of the
**Settings** screen and selecting your repository. This works with both the
**Deploy with Git** and **Deploy with CLI** deploy modes.
If your organization uses SAML SSO for GitHub authentication, make sure to start an active SAML
session prior to connecting to your GitHub account from Cube.
What happens after connecting depends on the deploy mode:
* In **Deploy with Git** mode, pushes to the configured production branch
trigger a build when the Cube project changes.
* In **Deploy with CLI** mode, production deployment remains manual. See
[Connecting GitHub on a CLI deployment](#connecting-github-on-a-cli-deployment).
### GitHub App permissions
Install the **Cube Cloud GitHub App** on the account that owns the repository:
your personal account for a personal repository, or the organization for an
organization repository. Authorizing your GitHub login alone does not give the
app access to an organization's repositories. If the account is missing in
**Connect to GitHub**, choose **Add new organization** in the account selector
to open GitHub's app installation dialog.
Grant the installation access to the repository you want to connect, either
through **Only select repositories** or **All repositories**. GitHub displays the
full requested permission set during installation. The integration uses access
to repository contents to read and push commits, pull requests to propose model
changes, repository administration to create repositories, and webhooks to
receive push, pull-request, and branch-delete events.
Complete installation and any required organization-owner approval **before**
connecting or creating a repository. Your own GitHub access and the app's access
are separate: for a missing organization repository, check both with an owner.
If your organization restricts repository creation by apps, have an owner review
that policy or create the repository in GitHub and grant the app access to it.
### Creating a new repository
In **Connect to GitHub**, choose **Create new repository** to create a repository
under the selected GitHub account. This flow pushes the deployment's existing Git
content to GitHub; creating a repository does not itself generate a data model.
For an organization repository, Cube creates it using the app installation and
does not add you as a collaborator. The organization owns the repository. If you
cannot find or access it, ask an organization owner to grant you or your team
access.
### Project directory
When connecting an **existing** repository, the selected branch must contain
committed files in `model/` or legacy `schema/` under the Cube project directory.
For example, for `analytics/model/cubes/orders.yml`, set the project directory to
`analytics`, not `analytics/model`. Leave it empty for a project at the repository
root.
If you see **"Data Model folder not found at this location."** or **"Data Model
folder not found at root location."**, check the selected branch and project
directory. An empty repository cannot pass this validation. Commit and push your
model first, or create a project from scratch in Cube and connect a new repository
after generating the model.
## Keeping your repository in sync
GitHub push webhooks synchronize branches already added to Cube. Git
synchronization and environment activation are separate: see
[deployment environments][ref-environments] for when staging and development
environments are available and how suspension works.
When connecting an existing repository, Cube clones it before completing the
connection. A successful connection does not mean the initial production build
has finished.
Users with permission to edit the model can select an existing GitHub branch in
the branch switcher to add it to Cube; no new push is required. Select the
intended branch before comparing the IDE or **Cubes & Views** in Explore with
GitHub. If you are already in development mode, use
[pull from remote][ref-dev-mode-pull] to update your personal working copy with
changes pushed to GitHub.
If a pushed change does not appear:
* Check the repository, branch, and project directory in **Settings → Build &
Deploy** and confirm the deploy mode.
* In GitHub's repository **Settings → Webhooks**, check that the Cube webhook is
active and inspect the push delivery and response. Fix any access or delivery
error before redelivering a failed event.
* Check the build status, then open the intended environment. If the change is
still missing, [contact support][ref-support] with the deployment, branch,
commit SHA, and webhook delivery result.
For generic SSH integrations, rapid pushes can receive `429` responses. See
[webhook response codes][ref-import-ssh-webhooks].
## Deploy with CLI
`cubejs-cli` is deprecated. Use the new [Cube CLI][ref-cli] instead. In CI,
authenticate with an API key rather than the deploy token — set `CUBE_API_URL`
and `CUBE_API_KEY` (or run `cube login --api-key --url `), then run
`cube deploy --directory .` (find the id with
`cube deployments list`).
When a deployment is configured to deploy with CLI, production builds are
**only** triggered when you (or your CI/CD pipeline) push the project to
Cube Cloud by running:
```bash theme={"dark"}
npx cubejs-cli deploy --token
```
You can find your Deploy Token, along with copy-paste instructions and an
example CI/CD pipeline config (such as a GitHub Actions workflow), on the
**Build & Deploy** tab of the **Settings** screen. The same screen lets you
regenerate the token if it needs to be rotated.
 Cube Cloud still maintains an internal Git repository for the deployment so
that features such as [development mode][ref-dev-mode] and branching can work.
CLI production builds use the uploaded project, independently of the Git
content used for development and branching. GitHub commits and UI merges are
not automatically included in that upload.
### Connecting GitHub on a CLI deployment
You can still [connect a GitHub repository](#deploy-with-github) to a CLI
deployment. When you do:
* Pushes to **non-production branches already added to Cube** are picked up by
the GitHub webhook and automatically synced.
* Pushes to the **production branch** are intentionally **not**
auto-deployed in CLI mode. Production deployment only changes when
somebody runs `cubejs-cli deploy` against the deployment.
This gives you GitHub-driven previews for feature work while keeping the
production deploy gated on an explicit CLI invocation (for example, from your
CI/CD pipeline after a release is approved).
### Development mode with CLI deployments
[Development mode][ref-dev-mode] is fully available on CLI deployments:
developers can enter dev mode, switch branches, save changes, commit them,
and even merge branches into the production branch from the Cube Cloud UI.
However, in CLI mode, **none of these actions trigger a production build or
redeploy**. Specifically:
* Saving or committing changes in dev mode only updates the per-developer
[development environment][ref-environments-dev] and the corresponding
branch in the internal repository. Production is not affected.
* Merging a branch into the production branch from the Cube Cloud UI updates
the production branch in the internal repository but **does not** rebuild
or redeploy the [production environment][ref-environments-prod].
* The next `cubejs-cli deploy` builds from your local project. Include any
changes made through the UI in that local project if you want them in
production.
In other words, a CLI-mode deployment will not change production just because
somebody pressed **Enter Development Mode** and merged a work-in-progress
branch — production only changes when somebody (or some pipeline) explicitly
runs `cubejs-cli deploy` against the deployment.
If you want changes made in the Cube Cloud UI to flow to production
automatically, switch the deployment to [Deploy with Git](#deploy-with-git).
[ref-dev-mode]: /docs/data-modeling/dev-mode
[ref-environments-dev]: /admin/deployment/environments#development-environments
[ref-environments-prod]: /admin/deployment/environments#production-environment
[ref-cli]: /reference/cli
[ref-import-ssh]: /docs/getting-started/migrate-from-core/import-git-repository-via-ssh
[ref-import-ssh-webhooks]: /docs/getting-started/migrate-from-core/import-git-repository-via-ssh#webhook-format
[ref-support]: /admin/account-billing/support
[ref-dev-mode-pull]: /docs/data-modeling/dev-mode#updating-the-branch
[ref-environments]: /admin/deployment/environments
This documentation is built and hosted on [Mintlify](https://mintlify.com), a developer documentation platform.
Cube Cloud still maintains an internal Git repository for the deployment so
that features such as [development mode][ref-dev-mode] and branching can work.
CLI production builds use the uploaded project, independently of the Git
content used for development and branching. GitHub commits and UI merges are
not automatically included in that upload.
### Connecting GitHub on a CLI deployment
You can still [connect a GitHub repository](#deploy-with-github) to a CLI
deployment. When you do:
* Pushes to **non-production branches already added to Cube** are picked up by
the GitHub webhook and automatically synced.
* Pushes to the **production branch** are intentionally **not**
auto-deployed in CLI mode. Production deployment only changes when
somebody runs `cubejs-cli deploy` against the deployment.
This gives you GitHub-driven previews for feature work while keeping the
production deploy gated on an explicit CLI invocation (for example, from your
CI/CD pipeline after a release is approved).
### Development mode with CLI deployments
[Development mode][ref-dev-mode] is fully available on CLI deployments:
developers can enter dev mode, switch branches, save changes, commit them,
and even merge branches into the production branch from the Cube Cloud UI.
However, in CLI mode, **none of these actions trigger a production build or
redeploy**. Specifically:
* Saving or committing changes in dev mode only updates the per-developer
[development environment][ref-environments-dev] and the corresponding
branch in the internal repository. Production is not affected.
* Merging a branch into the production branch from the Cube Cloud UI updates
the production branch in the internal repository but **does not** rebuild
or redeploy the [production environment][ref-environments-prod].
* The next `cubejs-cli deploy` builds from your local project. Include any
changes made through the UI in that local project if you want them in
production.
In other words, a CLI-mode deployment will not change production just because
somebody pressed **Enter Development Mode** and merged a work-in-progress
branch — production only changes when somebody (or some pipeline) explicitly
runs `cubejs-cli deploy` against the deployment.
If you want changes made in the Cube Cloud UI to flow to production
automatically, switch the deployment to [Deploy with Git](#deploy-with-git).
[ref-dev-mode]: /docs/data-modeling/dev-mode
[ref-environments-dev]: /admin/deployment/environments#development-environments
[ref-environments-prod]: /admin/deployment/environments#production-environment
[ref-cli]: /reference/cli
[ref-import-ssh]: /docs/getting-started/migrate-from-core/import-git-repository-via-ssh
[ref-import-ssh-webhooks]: /docs/getting-started/migrate-from-core/import-git-repository-via-ssh#webhook-format
[ref-support]: /admin/account-billing/support
[ref-dev-mode-pull]: /docs/data-modeling/dev-mode#updating-the-branch
[ref-environments]: /admin/deployment/environments
This documentation is built and hosted on [Mintlify](https://mintlify.com), a developer documentation platform.